- The Prompt Craftsman
- Posts
- 🔥 ChatGPT Tips Tuesday #14: Zapier makes your life easier!
🔥 ChatGPT Tips Tuesday #14: Zapier makes your life easier!
Using the Zapier plugin to simplify your workflow with ChatGPT
Minjie Shi
June 27, 2023
💡 ChatGPT Tips for the day
Zapier Plugin allows you to pass information from ChatGPT to tons of other applications, like, Gmail, Google Workspace, CRM, etc. Explore how you can use Zapier to make your life easier.
As mentioned last week, I am going to talk about using the Zapier plugin with ChatGPT.
For the demo, I would like to use the Zapier Plugin so that I can keep track of news from the internet and store them in a Google sheet.
Before using the Zapier Plugin
Unlike other Plugins that you can use it without any preparations, you would need some setup before using the Zapier Plugin.
1. Get a Zapier account
You would need to have a Zapier account yourself. To register, simply visit Zapier’s home page. Zapier does provide some free zaps to be used each month. However, if you do use it a lot, you might need to go with Zapier’s paid plans. To understand their plans, check here.
2. Install Zapier Plugin
Once you have got the Zapier account, you can now install the Zapier Plugin via ChatGPT’s Plugin Store.

3. Allow Zapier to connect with ChatGPT
Once you have clicked the install button, you would be asked to provide your consent for the connection between Zapier and ChatGPT.

4. Set up your Zap
Now on to the fun part, you can set up a Zap for Zapier. Just click on the incomplete action section to start the journey.

For the Zap setup, you would need to identify what action is required. I believe there is some AI there where you can simply type in what you want and you can see what relevant action from Zapier is available.

For this demo case, we would go with “add row” and find “Google Sheets: Create Spreadsheet Row” as we would like to collect different news and store them in Google Sheets.

From there, you might be asked to connect with your Google Sheets account if you don’t have one yet. Once that account connection is created, you would need to identify on which spreadsheet and worksheet, i.e. sheet within the spreadsheet, you would like to pass the information. You have the option to either choose a specific spreadsheet and/or worksheet in your Zap or let AI guesses what spreadsheet or worksheet to write information to. Using the guess option, I guess that ChatGPT would be able to detect the destination based on the prompt you provided to ChatGPT. For our demo, I have to go with setting a specific spreadsheet.

Now if you click “Enable action”, you would be directed to the previous page and see an action is created and turned on. We would then be ready to do actual prompting with ChatGPT then.

Using the Zapier Plugin
To use the plugin, it is actually just like any of your normal Plugins. You would need to enable it so that ChatGPT knows that you intended to use this Plugin.
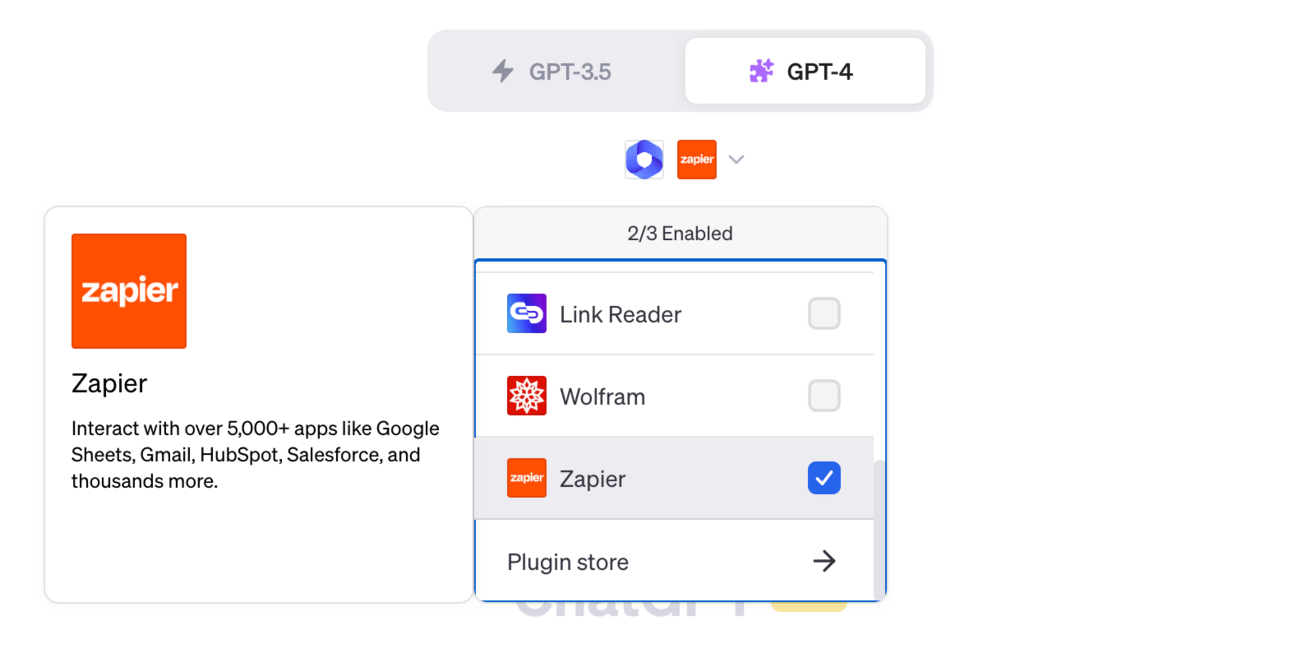
As you can see from the screenshot above, I have actually enabled another Plugin, which is WebPilot so that ChatGPT can grab the content from a URL and summarise it by ChatGPT.
The prompt I have used is the following. If you are curious, the news I have used is the one where ChatGPT has been sued for defamation.
Summary the news from this URL: https://www.theverge.com/2023/6/9/23755057/openai-chatgpt-false-information-defamation-lawsuit and save the News title, publication, summary of the news, and the URL in the AI News collection spreadsheetThe prompt above is actually quite simple and no need to point out specifically what Plugin to use. Here is a snapshot of what ChatGPT’s response is and you can see how ChatGPT is using those two Plugins in steps. ChatGPT is clever enough to understand to use WebPilot to pick the content from the link, summarise the content, and then use Zapier to push the content to the spreadsheet.

Although, one thing that is different about Zapier Plugin is that you would need to review and confirm the action before getting the content actually pushed to the spreadsheet. This is what you are going to see if you click on the “click here” Zapier link and you would need to confirm from it to push the content.

Once all of those are done, you would see the summary getting pushed to the spreadsheet along with all the key information. Finally, it worked 🥳

Alright, here is how you can set up and use the Zapier Plugin in ChatGPT. If you have any questions regarding using the Zapier Plugins, feel free to drop me a message at [email protected] or hit me up on my Twitter @AnInquisitiveMd.
🔤 Word of the day
Endpoint
n. in the context of computer networking and internet technologies is, in the simplest terms, one end of a communication channel. It's the place where information enters or leaves a network.
To put it in everyday terms, let's consider an analogy: imagine a mail delivery system. In this system, you can think of an endpoint as the address that mail is either sent to (the receiver's address) or sent from (the sender's address). It is essentially a specific destination or origin for the information (or mail in this analogy).
So, in computing and internet terms, an endpoint can be a specific URL (like an address) where a web service (like a mail service) can send or receive data. In a broader context, it could also refer to devices like laptops, smartphones, or tablets on a network – each of these devices would be considered an "endpoint" of the network.
🖼️ Image of the day
ChatGPT in the world of wizards 🧙

That is it for the day!
Until I see you next time, stay awesome my friend!
Cheers,
Minjie
Reply